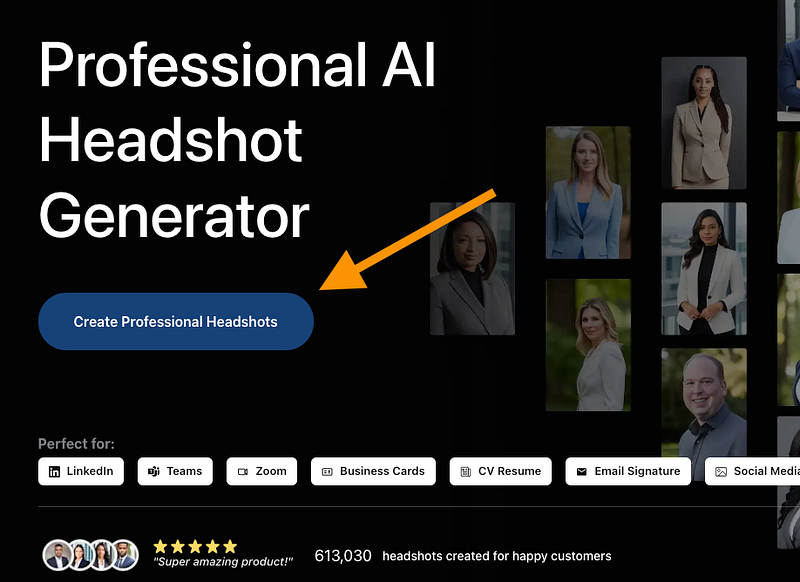
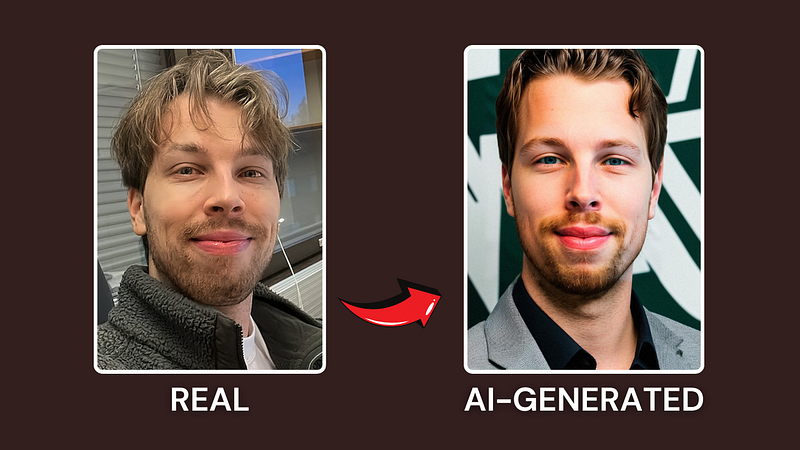
I tested Quick AI Headshots $59 plan to see if it’s worth it or not.
On top of that, I’ve tested all the 40+ notable AI headshot generators on the market.
In this post, I will show you my results with Quick AI Headshots and compare those with the best headshot generators out there.
Let’s go!
Disclaimer: This post has affiliate links at no cost to you.
My Experience
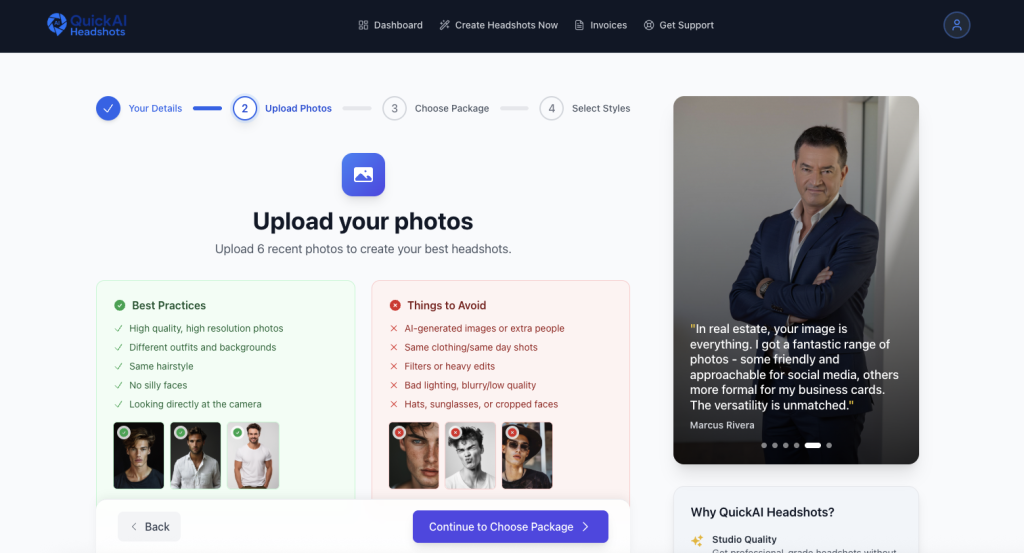
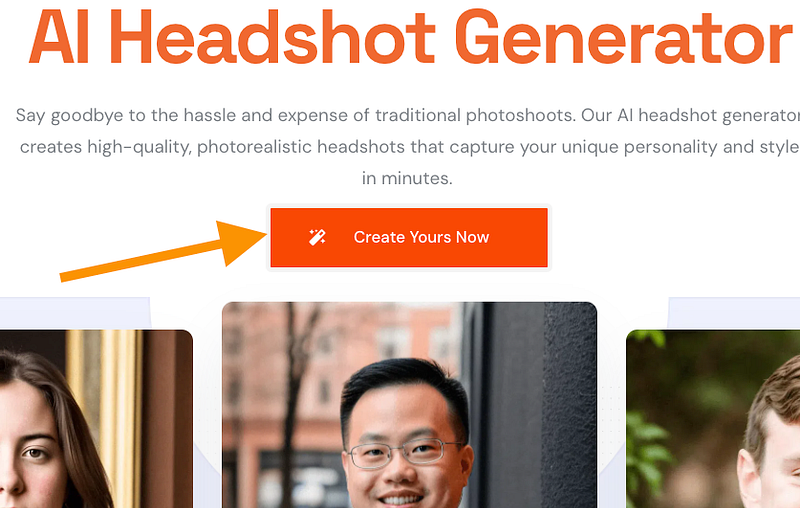
Using Quick AI Headshots is easy.
Just go to their website and read the instructions.
You need to upload a bunch of images of yourself.
I noticed that this tool was pretty strict what images it accepts.
That’s good because then the quality of the outputs won’t be bad.
However, that’s also a bit problematic: I am one of those that happens to take a lot of selfies and images of myself from time to time. Yet even I had hard time finding all the images to use.
Also, you don’t just want to take a set of selfies in the same spot and attire because the AI won’t see you in different contexts.
So to use this tool, you should have a boat load of good images of yourself.
If you don’t, then just take a bunch of selfies, but that’s suboptimal based on my experience.
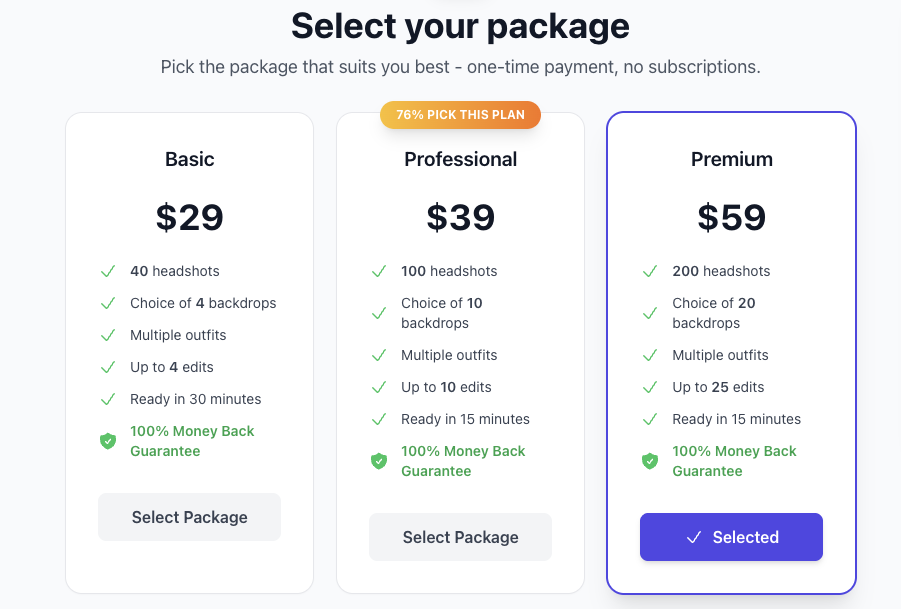
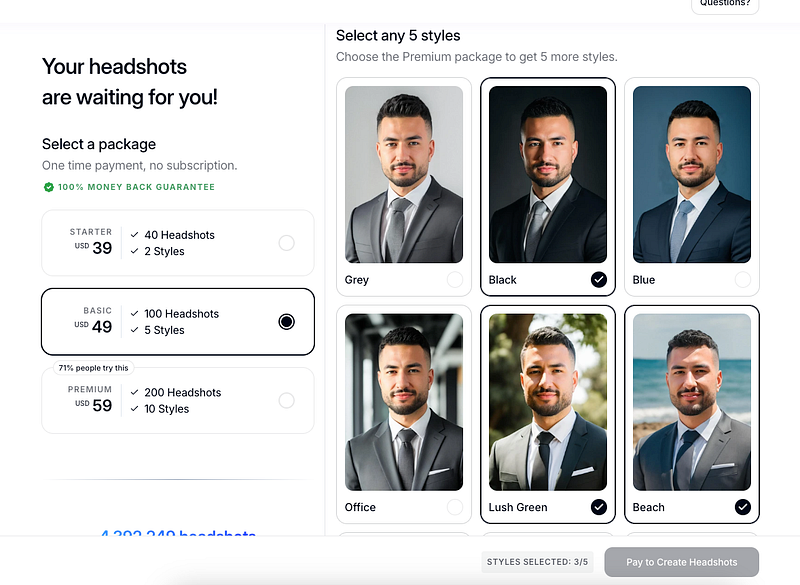
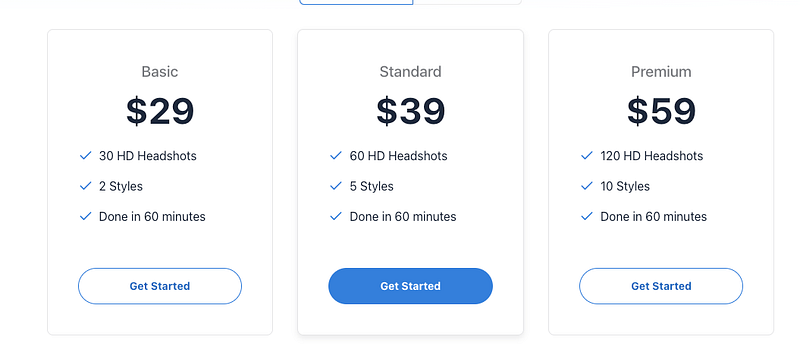
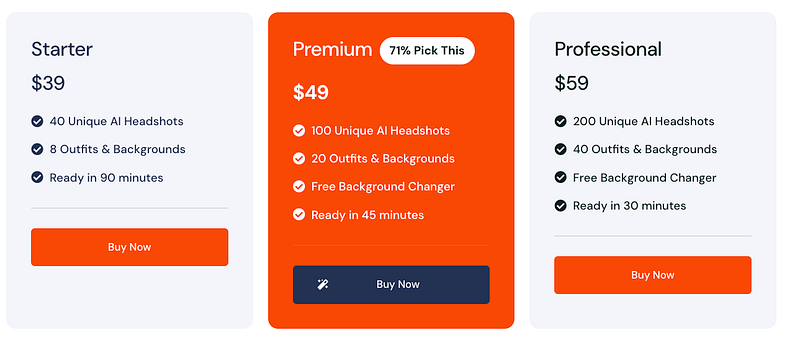
Then, once you’ve uploaded your images, pick a plan.
Here are the pricing options:
Once you’ve paid for it, then choose the styles you want to roll with.
There are lots of those.
The best part is that you can choose up to 20 styles.
I picked all of them since there were so many good-looking options.
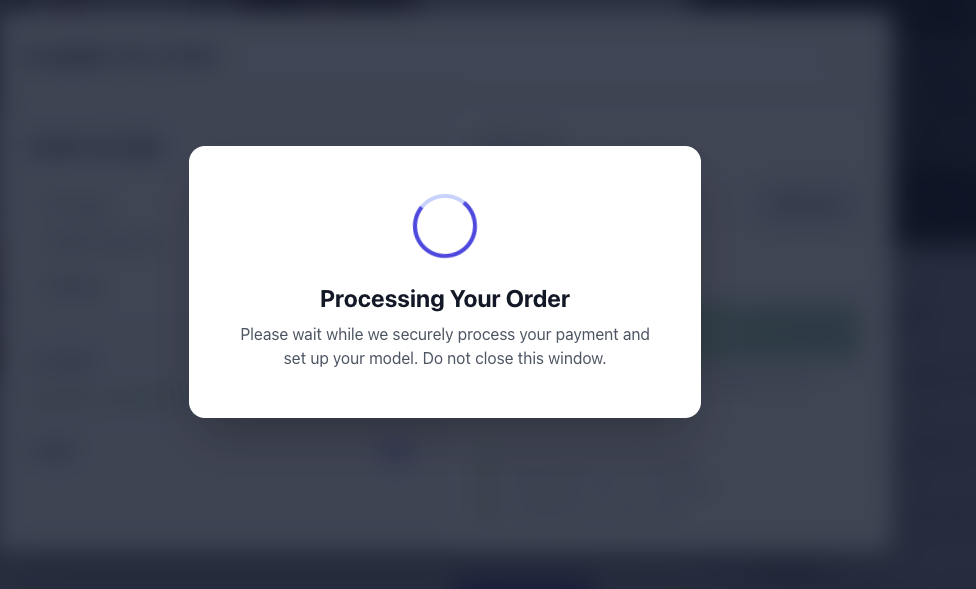
Then, just hit “Pay Now”.
After that, the AI starts to generate your headshots.
All you need to do is wait. You don’t need to keep the window open—the processing happens behind the scenes! You’ll get an email once the headshots are ready.
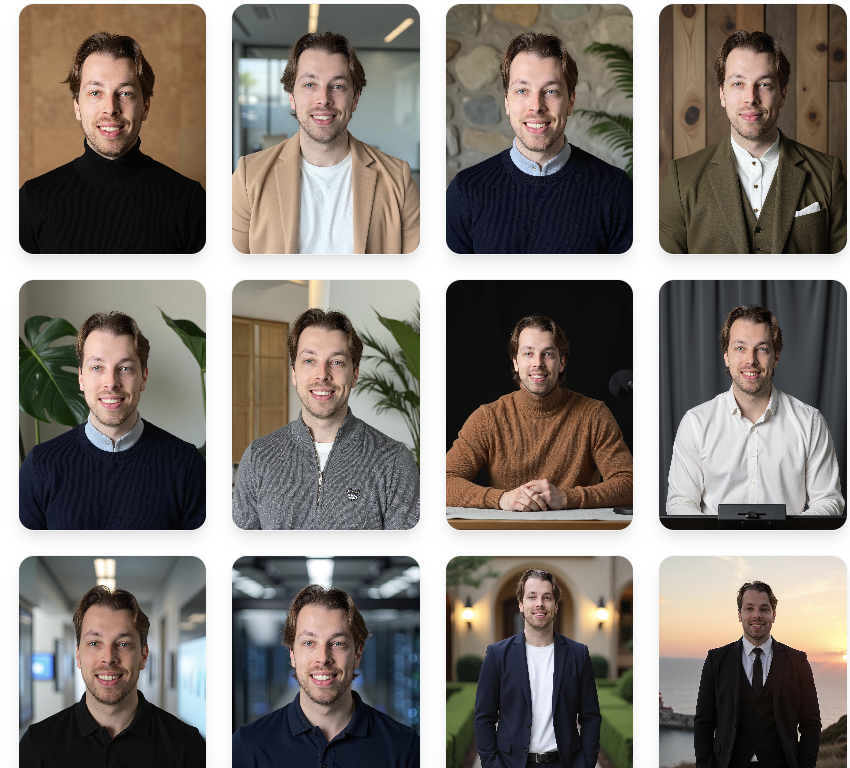
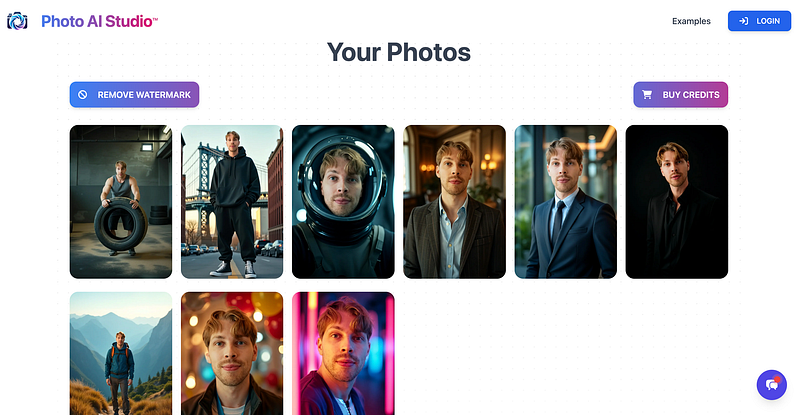
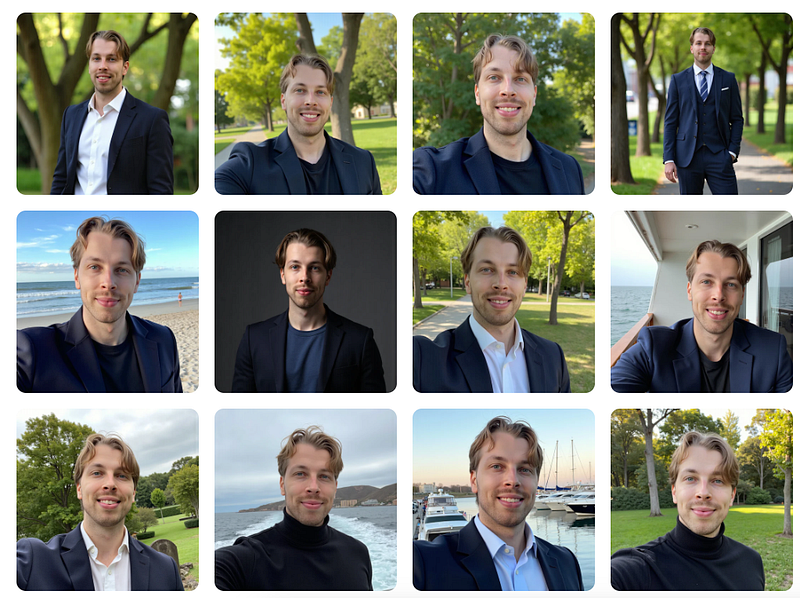
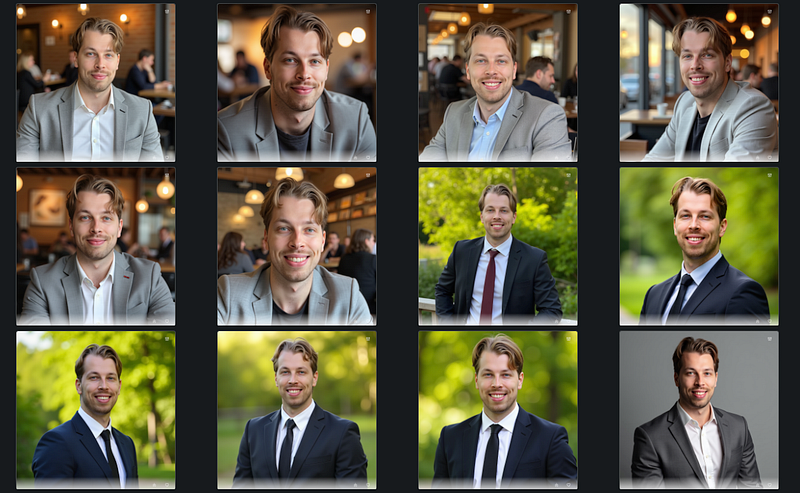
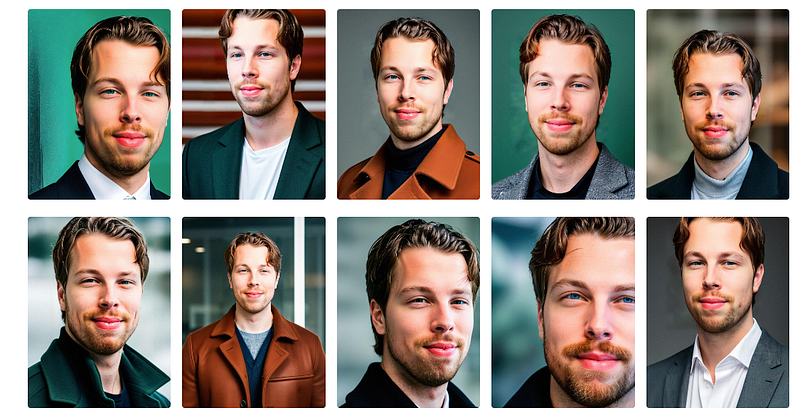
Here are my results that I got from Quick AI Headshots.
The tool lets you preview each image in LinkedIn profile.
This way you get an idea what it would look like on your profile.
However, the tool doesn’t let you preview images in full size.
To do that, you need to download the images.
Here are some of my favorites:
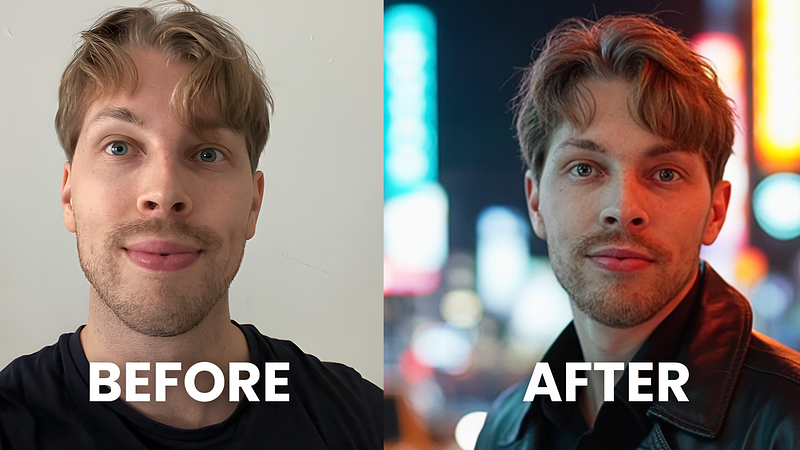
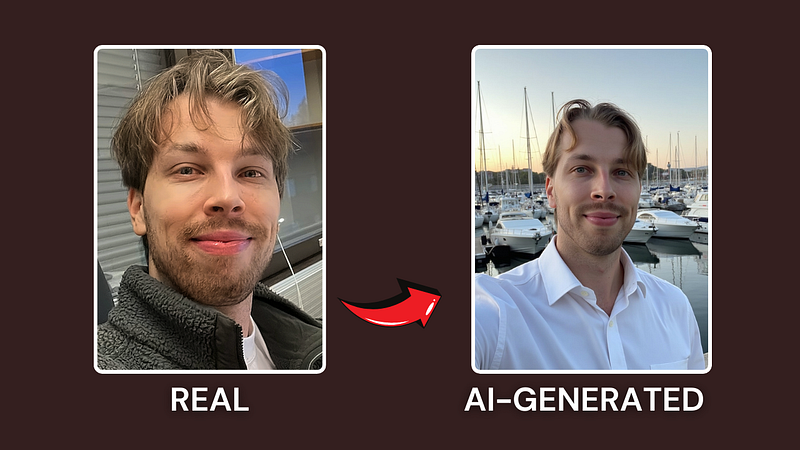
The last one is my overall favorite.
It looks pretty much exactly like me, and would be hard to tell it’s not.
But most images just failed.
In fact, out of the 167 headshots I got, I’d say only 2-3 are usable.
Surely, they all could be my LinkedIn images if you were only allowed to see the small preview icon.
But when you open the images full screen, those look terrible.
Even the best ones have a very weird smooth filter. Also, the resolution seems to be very low, which is likely why you’re not allowed to view full-size images in the UI.
Lastly, I asked for a public-speech headshot. In fact, it’s one of the reasons I wanted to try this tool.
But the AI ignored my wish, and there’s no public speech headshot in my gallery.
So overall, this is a decent tool. The top 3 results I got were nice!
So it’s definitely not the worst, even though it was strict and didn’t give me results I was looking for.
But certainly, it’s not the best AI headshot generator either.
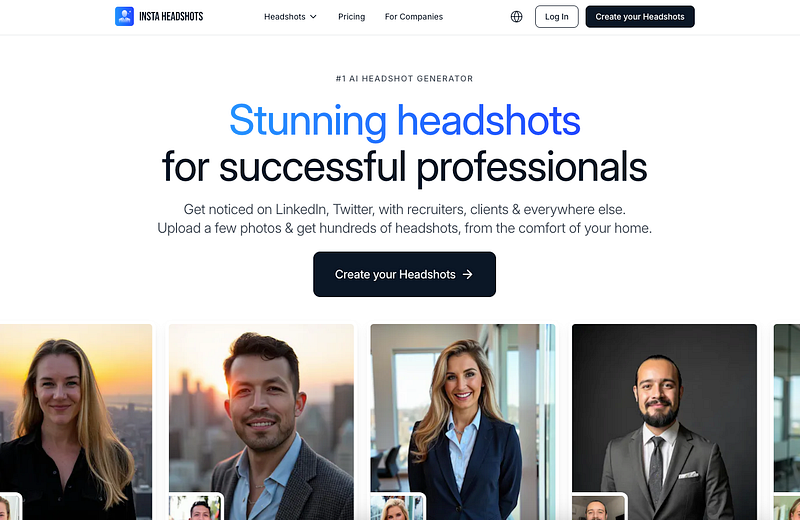
InstaHeadshots is a newer AI selfie generator that turns your selfies into realistic shots in different settings.
Upload your photos, wait about 30 minutes, and your selfies will be ready.
Here are my results.
My results
Here’s my favorite selfie that InstaHeadshots made:
As you can see, it’s very realistic.
I can’t even tell it’s not actually me.
I also like the background—it looks just like a real-life setting. You’d never guess this was made by AI.
To try it, go to their website and click Create Your Headshots.
After that, the tool will ask you a few simple questions about yourself, like gender and style preferences.
Then upload your images, and you’re all set.
This is the same process for the rest of the tools on this list, so I won’t walk you through each one—it’s simple and easy to follow.
Once your selfies are ready, you’ll get an email with a link to view them.
Here are some of mine:
Here are more AI-generated selfies:
These turned out great. As a spoiler, this tool gave me more selfies than any other one on the list—though that might be because I uploaded more photos here than I did with the others.
Pros
Fast: Most AI selfie generators take hours to render. This one was done in 20–30 minutes.
Realistic: The images look so much like me that friends and family can’t tell they’re AI-made.
Variation: You get multiple selfies in different settings, outfits, and lighting.
Edits: Built-in AI editor lets you fine-tune your selfies.
Cons
Pricey: No free trial is available.
Smoothness: Some selfies look overly smooth, like a heavy filter was applied, which can give away that they’re AI-generated.
Tips
If you want fewer final selfies, upload fewer selfies to start with.
To edit a selfie, click on it and select “Edit.” This opens the AI editor for more adjustments.
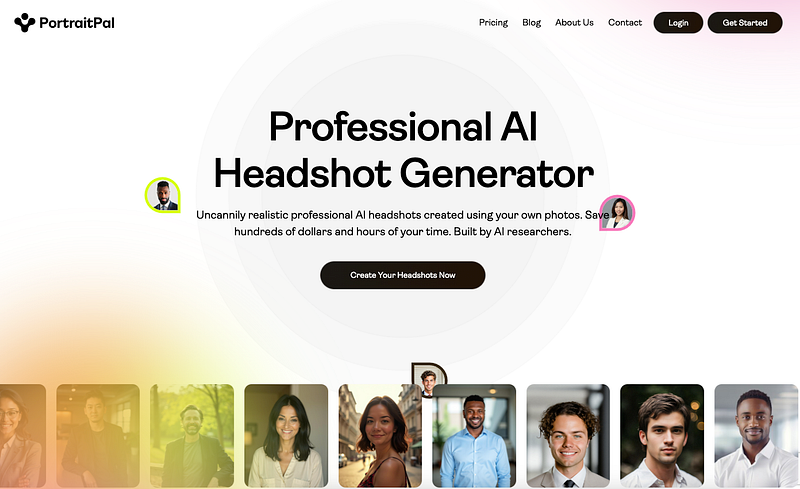
It’s not strictly a selfie generator—it’s more of an AI headshot creator.
It produces some selfies, but also highly realistic, professional-looking images you can use anywhere.
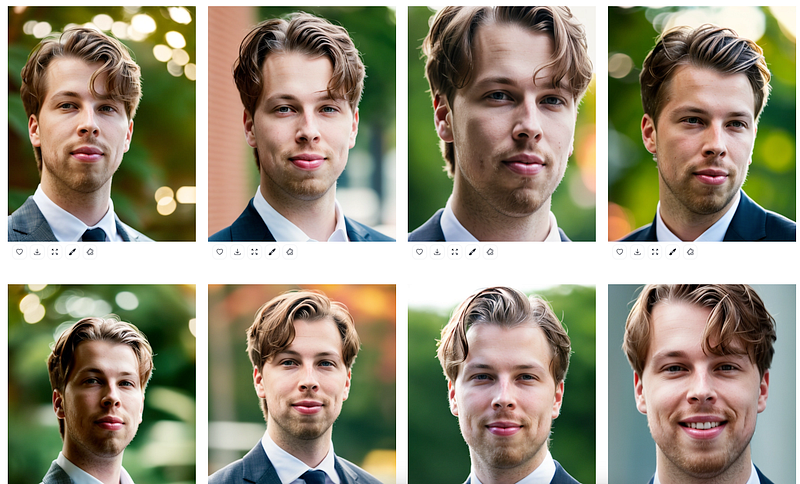
Here are my results!
My results
Here’s one of the selfies PortraitPal made for me:
To make your own AI portraits, go to the site and click “Create Your Headshots Now.” The process is quick and straightforward—they handle the rest.
Once they’re ready, you’ll get your headshots by email.
Here are mine:
Here are more:
ChatGPT said:
As you can see, there’s a lot of variety here. Most of the shots are headshots rather than selfies, but they still look fantastic. What an impressive tool!
Pros
Super realistic: The images look like me, and I like the professional feel they have.
Easiest to use: All these tools are simple, but this one skips all the extra steps—just upload your images and get your results.
Cons
No edits: You can’t edit your selfies or headshots in this tool.
Pricey: A bit expensive, especially without editing features.
Tips
If you only want selfies, upload more selfie-style images when generating your pictures.
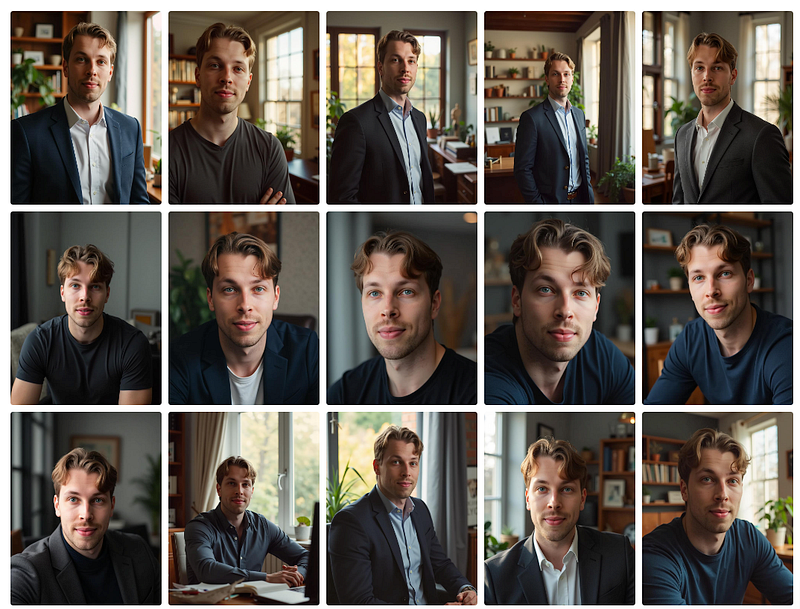
Another great AI selfie generator is HeadshotsByAI. It makes professional, sharp, high-quality selfies from the images you upload.
Here are my results.
My results
Here’s the selfie HeadshotsByAI made for me:
To make your own set, go to the site and click “Create Professional Headshots.”
Then answer the questions, upload your images, and wait.
After a short while, you’ll get your AI-generated selfies and headshots by email.
Here are mine:
As you can see, most of the results are professional headshots, with a few selfies mixed in.
The images are sharper than anything I’ve seen from the other tools on this list.
The only downside is that in some shots, my forehead looks a bit too big and my skin is overly smooth or glowing—but aside from that, I can’t complain!
Pros
High quality: Sharper images than any other similar tool I’ve tried.
Realistic selfies: Most of the selfies look very accurate and true to me.
Faster than most: Took only about 45 minutes to generate.
Cons
Few selfies: The majority are professional headshots rather than casual selfies.
Artifacts: Some images have visible flaws, especially when you look closely.
I’ve spent over $3,000 trying different AI headshot generators, and I can tell this from experience.
Let me show you my results with Canva and let’s compare those with actual good headshot generators.
My Experience with Canva AI Headshots
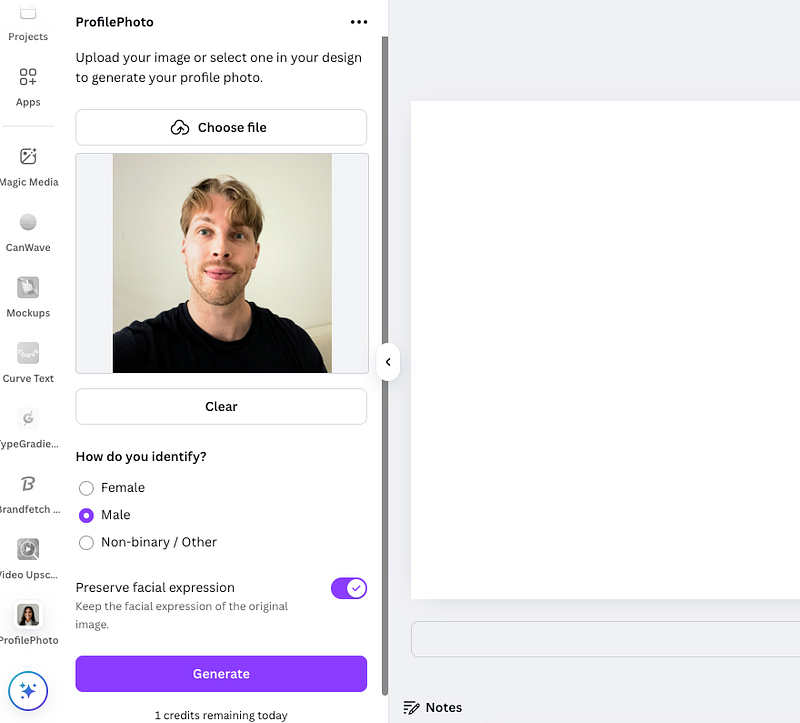
Using Canva AI headshot generator is not hard. Just head over to this page (or Google for Canva AI Headshots).
Once you’ve done that, upload an image of yourself, choose your gender and wait:
Then it only takes about 10 seconds and you will receive an AI-generated version of yourself.
That sounds a bit too good to be true, right? And that’s exactly what it is.
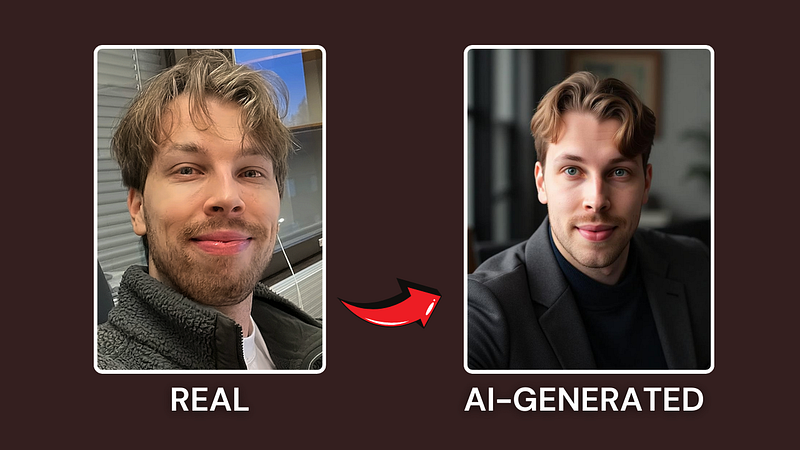
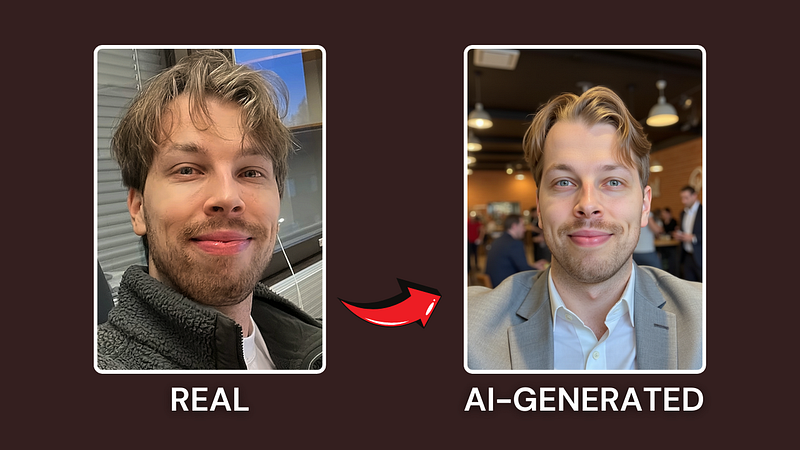
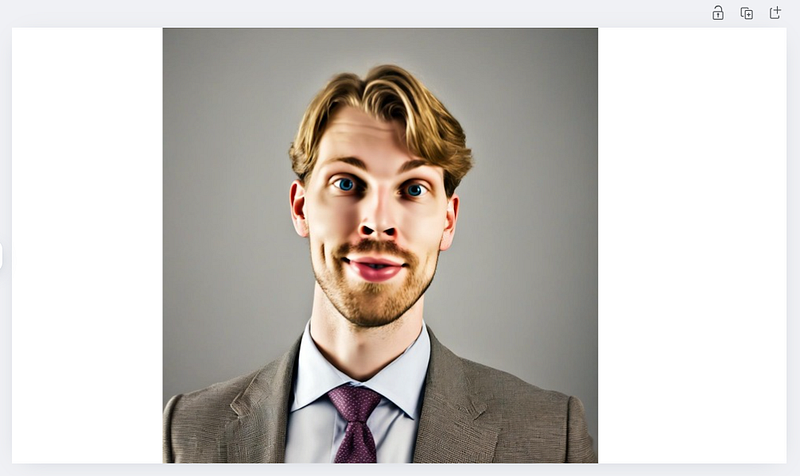
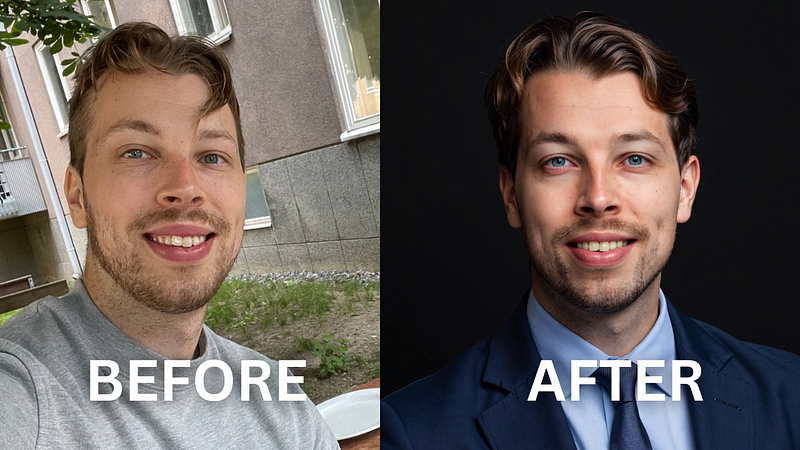
Here’s the AI headshot I got from Canva:
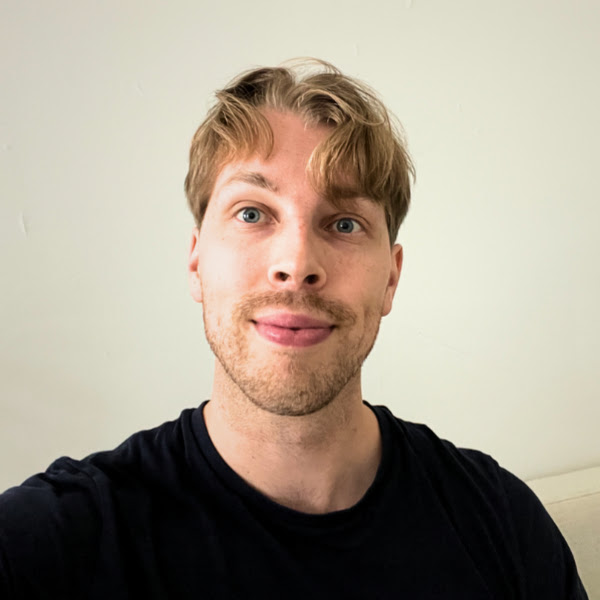
Just for comparison, here’s what I look like in the real world:
That AI headshot is just terrible.
It looks like one of those earlier-day Instagram photos with all filters. On top of that, the headshot looks completely AI-generated, 3D character.
Despite most Canva apps being great, this one was a total waste of time.
This AI headshot thing is just there so that they don’t miss out on potential hype/growth.
That’s my opinion when I look at it.
From a business standpoint, this is smart. There are lots of people searching for AI headshot generators. A portion of those people will surely convert to paying Canva subscribers. But for users this is just terrible.
⭐ My Grade ⭐
Realistic: 1.0/5
Customizable: 0/5
Waiting time: 5/5
Total: 1.1/5
Alternatives
Let me show you much better Canva AI headshot generator alternatives.
Disclaimer: This post has affiliate links at no cost to you.
My Experience
Let me show you how to use this tool and what kinds of results I got from it.
To use GoStudio to get your headshots, sign up for their site.
Click on “Get Your Headshots.”
Pick your style and gender:
Read the instructions on how to upload the best images to get the best results.
This is the place where you let the AI know what you look like. I recommend spending a while on picking the photos to get the best results.
Then it’s time to upload your selfies for the AI to know what you look like.
Here’s what I sent in:
Here I noticed that some of my images would fail to upload to the server.
This would completely freeze the UI and I wouldn’t be able to move on to the next step no matter what I did.
It was annoying, I’ve got to admit. It felt like this is an over-the-weekend project designed to just try to print money instead of solving a problem.
But yeah, after a couple of attempts, I got it done.
Then you need to pick a plan for your AI headshots.
I usually go with the plan that gives you the most headshots—it just gives you the best shot at getting a few solid ones. Most of them don’t turn out great anyway.
One thing that stood out with GoStudio was how simple it is. That’s both a plus and a minus.
On the plus side, you don’t need to upload 20+ photos or fill out a bunch of personal info like some other tools require.
But on the downside, it’s definitely more limited than the top-tier AI headshot generators out there.
Anyway, let’s get into the results.
Here are the AI headshots I got from GoStudio:
I was pretty happy with them. They look like me and I’m wearing a suit.
Here are some more results:
These just feel way too generic—flat, even—compared to what the best tools can do.
Most of the shots look nearly identical. Same aspect ratio, same suit, barely any variation. In one, I was sitting. A couple had slightly different poses. That’s about it.
Not much range to work with.
One thing I’ll give them credit for: the headshots don’t have that weird, fake AI look. They mostly feel like real photos, which is actually pretty solid.
There’s not a whole lot to complain about, to be fair—but overall, it just feels kind of basic and limited next to the better tools I’ve tried.
Also worth noting: there are no edits, no customization. What you get is what you get.
That alone knocks it down a notch compared to the top options out there.
Pros
Super simple to use – From sign-up to getting your results, it’s all pretty straightforward. No unnecessary steps or confusing setup. Just upload, wait, done.
Surprisingly realistic output – At least in my case, the headshots actually looked like me. No weird AI artifacts or uncanny valley stuff, which isn’t always a given with these tools.
Cons
No editing or customization – What you see is what you get. If something’s slightly off—or just doesn’t work for you—there’s no way to fix it. That can be frustrating.
Slower turnaround time – Don’t expect instant results. It took a couple of hours before I got mine, which feels a bit slow compared to some of the faster tools out there.
Clunky UI – Uploading images was weirdly difficult. It took me a few tries to actually get everything to load properly. Not a dealbreaker, but definitely something they need to smooth out.
Pricing
Standard ($24 one-time): 40+ headshots, 1-hour processing, 1 pack, 20 poses, great for resumes.
I actually ended up with more usable shots than I expected. Definitely better than I thought going in.
And the pricing—especially for the smaller plans—is super reasonable.
One of the most affordable tools I tried.
These are great for stuff like LinkedIn, your resume, or any other online profile where you just need to look clean and professional.
Would I use them for something big like engagement photos? Probably not. But if you just want to skip the whole photoshoot, avoid awkward posing, and still come out looking sharp, this totally does the trick.
It’s not flawless—some shots won’t hit—but you get so many that a few are almost guaranteed to work.
Magic Photos AI is hands down one of the best tools I’ve used for creating social media profile pictures.
It’s not really built for professional headshots—it’s more about natural, candid-style photos.
The lighting is great, the image quality is sharp, and most of the pictures looked like casual selfies I’d actually post on Instagram.
In this post, I will show you my results so that you know what to expect.
Let’s jump in!
Disclaimer: This post has affiliate links at no cost to you.
My Results
Before I show you my results, let me quickly show you how easy it is to use this AI headshot generator.
First, head over to their website.
Once you’re there, sign up and start a new photoshoot.
Just name the shoot (use your name) and choose your gender.
Next, you’ll need to show the AI what you look like. The best way to do this is by reading their instructions closely on this page:
Drop your photos into the upload area.
The tool will do a quick quality check. If any are too low-res, it won’t accept them—poor quality makes it hard for the AI to see you clearly, and that can lead to weird or distorted results.
After this step, it’s time to pick a plan:
I went with the $69 plan—it gives you 200 photos, 10 different styles, and the fastest turnaround time.
Now for the fun part: picking your styles. Magic Photos offers a ton of options to choose from!
After you’ve picked your styles, take a moment to review everything in the final screen before hitting generate.
Now just start the process.
With the highest-tier plan, it takes about 15 minutes. If you go with the cheapest one, expect to wait around 90 minutes.
When it’s done processing, head to your profile to check out your AI-generated images.
You’ll also get an email letting you know your headshots are ready.
Here are my candid AI headshots that I got from Magic Photos AI:
Pretty cool, right?
Quick heads-up: when you preview the images, they’ll have watermarks—even if you paid.
But don’t worry—they’re gone once you download the files.
The watermarks are just there to prevent people from generating photos, saving them, and then trying to cancel for a refund. It’s a way to stop misuse.
Anyway, here are a few of my favorites for you to check out:
They all look super realistic—and honestly, just like me.
With 10 styles and 200 photos, I found at least 1–2 solid images per style. That’s a win, especially since a lot of AI headshot tools only give you 0–5 good ones total. This one gave me around 20 that I’d actually use.
Plus, you can even edit your photos right in the tool.
To do this, select an image, and click “Edit”.
Choose what you want to do from changing outfit to regenerating a new photo:
In the above headshot, I had to change my ridiculous-looking green tight shirt to something that matches my style:
After a minute or two, I got this result:
That’s a lot better!
Here’s a comparison between the original AI headshot and the edited one:
That’s great! The image didn’t change too much, but the shirt is now different, which is exactly what I wanted.
Notice that if you do edits, those never take place directly on your image. It’s always a newly-created AI headshot. This means that there might be subtle changes to the photos.
Pros
Turnaround time was just 15 minutes—easily one of the fastest tools I’ve tried.
Most headshots looked super realistic. A few had small quirks, but nothing major.
I got at least 1–2 solid photos per style, which means about 20 great shots overall.
Even the top-tier plan is under $69—way cheaper (and simpler) than hiring a photographer.
Cons
Some photos came out weird or off. It happens.
Editing tools are pretty basic compared to platforms like BetterPic—but to be fair, this is one of the few that even lets you edit.
Pricing
Starter: $49
Basic: $59
Premium: $69
⭐ My Grade ⭐
Realistic: 4.0/5
Customizable: 2/5
Waiting time: 4.5/5
Value for money: 4.4/5
Total: 4.2/5
To Take Home
Magic Photos AI is a solid pick for profile pics, dating app photos, and more.
Some images do look a bit too smooth or overly polished which is a kind of a giveaway that they’re AI-generated.
But honestly, a few turned out so good I had to double-check they weren’t real.
The biggest downside is the limited editing. If a photo doesn’t work, you can tweak the outfit, regenerate it, or boost the resolution. However, there’s no human-style editing or virtual try-on feature yet.
But that’s still a lot better than most competing products that offer no edits at all!
I think this is one of the best AI profile picture generators on the market right now.
I upgraded to the Expert plan on BetterPic specifically to try out the human editing feature—and it was totally worth it. The platform itself is super easy to use.
Sign up here and read the image uploading instructions.
You just fill in a few basics—your name, ethnicity, gender, eye color, and what you’re using the photos for.
After that, you can pick a few styles for your AI headshots. Super straightforward.
I recommend picking all the 3 options for best outputs.
Make sure to actually read the image instructions—they’re super important. The quality of your LinkedIn headshots pretty much depends on this step. If you upload low-quality or blurry photos, the AI won’t have a clear sense of what you really look like.
I recommend uploading a mix of photos with different lighting, outfits, and angles. It helps the AI create more accurate and natural-looking results.
Here’s the image guide for reference:
Here are my real images I used to train the AI:
Once I uploaded my images, the tool automatically reviewed them and filtered out any that were too low in resolution. Super helpful.
Then it was time to generate the LinkedIn headshots!
It took around 20–30 minutes to generate 100 different images of me.
Now, let’s check out the results:
Honestly, I thought some of them looked amazing—so much so that I ended up changing my LinkedIn profile picture to one of them.
Here are more results:
I’d be lying if I said every single image turned out perfect.
As BetterPic notes on the results page, most of the images look great, some are just okay, and a few definitely miss the mark.
For example, in this one, you can spot some subtle artifacts around my face and teeth.
I can definitely see the flaws—can you spot them too?
The good news is, BetterPic makes it super easy to fix those little AI glitches. Just click the BP AI Edit button, and you’re good to go!
You can also request a manual edit from the BetterPic team if you want to make sure the image really looks like you.
Just pick the image you want, then select the “Human Edit” option from the list:
It’s a super handy feature—especially for teams that want consistent, professional-looking headshots across the board.
To get started, select the “Personal Branding” option.
Then, from your dashboard, choose the gallery you want to use for generating your images.
Enter your details:
Then choose the images of yourself and upload them to this view.
Here are images I used:
Then start training the AI and wait.
This can take about 45 minutes. The best part is that you don’t need to wait there or do anything. Just come back once they send you an email that your headshots are ready.
Once the email arrives, click the link and enjoy the LinkedIn headshots:
Here are some of the results I got:
Pretty amazing, right? These images look so realistic, it’s honestly hard to tell they’re AI-generated.
Here are a few more that the tool created for me:
I really love the lighting and the outfits in these shots.
The overall quality—especially the lighting—is better than anything I’ve seen from other tools.
That said, the biggest issue for me is that my forehead looks a bit too tall in some of the images. You probably wouldn’t even notice—it’s just one of those things I pick up on after seeing my own face in the mirror a million times.
There are also a few minor artifacts here and there, like weird-looking teeth or overly smooth skin.
But honestly, those issues are subtle and pretty rare. Most of the headshots turned out amazing!
Pros
Faster than most tools (around 25 minutes vs. 1–2 hours)
Produces highly realistic images with just 8 input photos
Smooth and easy-to-use interface
Offers AI editing features like background removal, eye color adjustments, and outfit changes
Cons
Not instant — 25 minutes might feel slow for some users
Occasional flaws (like odd eyes or imperfect teeth), similar to what you’d expect with most AI tools
Portrait Pal does a great job of creating incredibly realistic images. I’m genuinely happy with the results—there’s a ton of variety in styles and poses.
If you’re into vintage vibes or just want a wide range of professional-looking headshots, I’d definitely recommend giving it a try.
Aragon AI is an impressive AI portrait generator. The results are seriously next-level—especially now that they’ve upgraded their face generation algorithm.
Let me show you what it did with my photos.
My Experience
First, head over to the Aragon AI homepage and sign up. Click “Create Headshots” to start the generation process.
You’ll be asked a few basic questions—like your age—to help the AI create more accurate and personalized headshots.
Next, choose your preferred style for the headshots.
I went with business casual, which felt like the right balance of professional and relaxed.
Then upload a bunch of images of yourself for the tool to learn what you look like.
Here are the images I used:
Once you’re done with that, make sure every detail is correct:
Then send the order and wait!
Aragon AI sends you an email to let you know your AI LinkedIn headshots are done!
Here are my LinkedIn headshots that I got back from Aragon AI:
And that’s not all. Here are more images that it made for me:
Don’t forget that all images are not great. In fact, in Aragon, the results are significantly worse than in the top tools on the list.
However, you can click the Edit button to make AI adjustments. You can change backgrounds, replicate images, remove stuff from them, and so on. It couldn’t be easier.
However, the edits can’t quite save your images in my experience. The results just aren’t as good as the best tools give.
Pros
Somewhat realistic and usable results. Definitely a top 10 tool for sure. But it starts to get stuck in time.
This tool was a lot quicker than most AI headshot generators.
There are great, easy-to-use AI editing features that most platforms don’t have.
Cons
Some poses look strange. I prefer the ones where I’m just standing or sitting, but not when my hands are doing something.
Some photos look unrealistic or morphed — but that’s a common issue with all AI headshot generators.
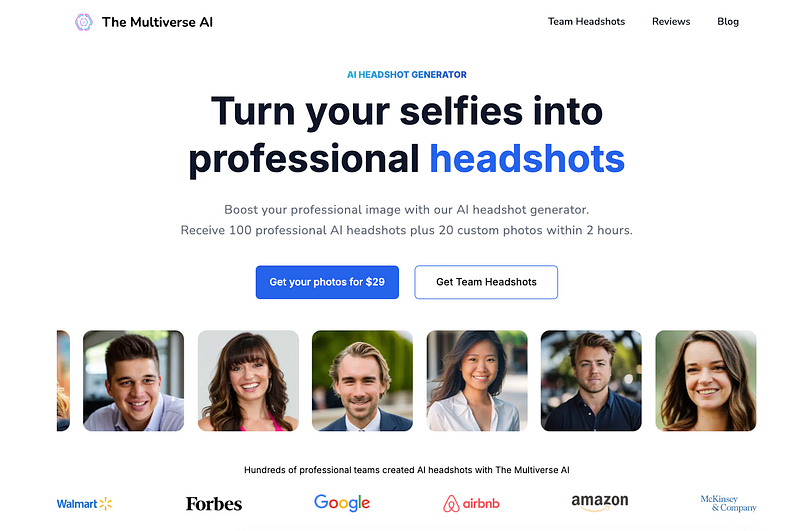
Multiverse AI is an AI headshot generator that takes your selfies, analyzes them, and then delivers a set of high-quality, professional-looking headshots.
But that’s not all—there’s also a custom feature that lets you create images based on your own prompts.
Next, you’ll be prompted to upload photos of yourself. Just a heads-up—don’t upload a bunch of similar selfies!
Upload your images here.
I’m using the same photos across all the tools on this list so I can compare the results fairly.
These are mostly close-up headshots or selfies. Multiverse AI includes a built-in editor to crop your photos—so go through each image and crop them following the guidelines it gives you.
One problem I ran into was the tool rejecting nearly every image I uploaded. That happened because the photos were too small.
If that happens, just use an image upscaler to enlarge your photos before uploading them again.
Next, upload your photos into the Multiverse AI editor one by one. Keep going until you have a total of 12 images.
If you don’t have enough, just snap some new pictures in different settings with your phone—but remember, avoid uploading a bunch of similar selfies.
Hit upload and wait.
For me, the AI took about 60 minutes to generate the images. You can close the window at this point since everything runs online.
Feel free to even shut down your computer after this step.
When the AI finishes, you’ll get an email like this:
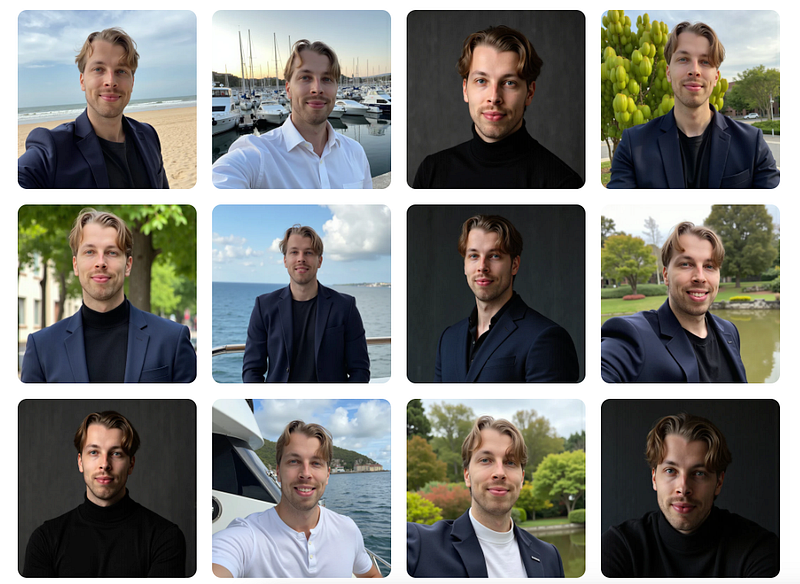
Here are the AI LinkedIn headshots I got:
What a handsome guy, right? These look 100% real to me. Maybe the one on the far right isn’t quite as accurate, but the two on the left? I’m honestly speechless!
Here are some real photos of me that I used for comparison:
The resolution and lighting in my original photos weren’t the best, but the AI still nailed my facial features and placed me perfectly in those professional-looking shots.
Here are a few more AI-generated headshots of me:
There are tons of images—probably around 100 AI-generated professional headshots in total.
You’ve got to give this one a try—especially the AI custom feature that lets you tell the AI exactly what you want to see in your photos.
Once you’ve created your images, you can check them out at themultiverse.ai/custom/.
Use my coupon ARTTURI to get 10% off.
Pros
Realistic headshots that look like they were taken by a professional
Plenty of different images across various settings
Perfect for use on your CV or LinkedIn profile
High-resolution photos with no obvious “robotic” or AI-generated look
Cons
Takes over 60 minutes to process
Some images still have a slight artificial vibe, especially compared to newer AI models
Many of my photos weren’t ideal for the AI to analyze
No free trial available
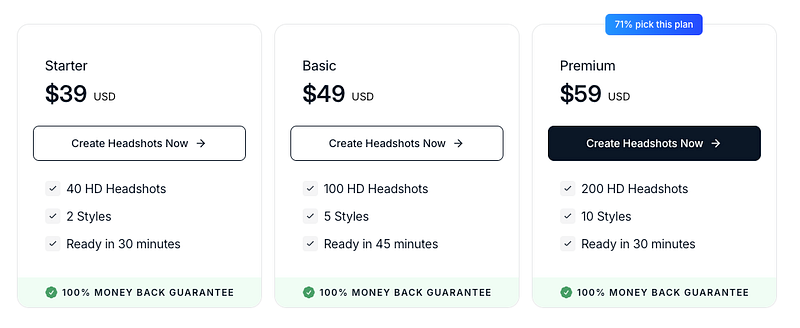
Pricing
The Multiverse AI costs $29.00. You can use the promo code HEADSHOTS along with my link to get 10% off.
Next up is ProfileBakery. You upload 6–15 photos of yourself, and it delivers 30–60 professional headshots with different lighting, outfits, and backgrounds.
The instructions for uploading your photos are straightforward and easy to follow:
Avoid random selfies, blurry photos, or pictures with other people in them. Use clear, well-lit images with different outfits and backgrounds. I used photos from my phone’s camera roll.
Here are some of the real photos I uploaded:
Drop them into the view.
The tool also asks you to pick a “baseline image,” which sets the default facial expression for your headshots. If you want your photos to have more smiles, make sure to choose a picture where you’re smiling.
Then just wait—mine took about 3 to 4 hours to get the LinkedIn headshots back.
You can close the window after uploading—ProfileBakery does all the processing on their servers. You’ll get an email notification when your images are ready, so no need to wait around.
Here are my LinkedIn headshots:
It’s a little odd that the photos come via Google Drive, but whatever.
Let’s take a closer look at the results.
They’re decent, but definitely not among the best I’ve seen. There’s a bit of a 3D character vibe to them.
Plus, from my experience, you can get similar results with free tools like Supawork.
Supawork is a free AI headshot generator that turns your selfies into professional LinkedIn and resume-ready photos. It offers different styles without needing you to sign up and puts user privacy first.
Unlike the paid tools on this list, Supawork is totally free and only needs one photo to create four AI-enhanced headshots.
It doesn’t give you as many options, but the images it produces are high quality and really look like you.
Let’s check out what it made for me.
My Experience
First, you’ll answer a few quick questions about your appearance—things like gender, age, hair color, eye color, and ethnicity. This helps the AI create a LinkedIn headshot that matches you closely.
Then upload an image of yourself:
Then wait:
After about a minute of processing, you’ll get a selection of AI-generated LinkedIn headshots that look like you.
Here are my results:
You can check out more results by opening the options on the left side.
For example, here are a few more LinkedIn headshots of me:
That’s pretty impressive—especially for a free tool. But let’s be real: it’s not a perfect match. The closer you look, the more it feels like a 3D-rendered character instead of an exact replica.
Also, don’t forget you can change the backgrounds in your photos using the editing options.
Pros
Fast: generates LinkedIn headshots in just a few minutes
Only requires one image—no need for 10–20 photos like other tools
Semi-realistic results that resemble you
Cons
Has a 3D-rendered, game-like look instead of a natural photo
Inconsistent quality—some images look robotic or don’t resemble you at all
Best background-changer AI headshot maker for LinkedIn
Next up is HeadshotPro, an AI-powered background-swapping tool that detects edges and removes you from your original photo.
The process is simple: upload your picture, and the tool quickly turns it into multiple professional LinkedIn headshots with different backgrounds. Like PFPMaker (which I covered in earlier articles), this tool doesn’t create a new face—it just enhances your existing photos with fresh backgrounds.
Let me show you what I got!
My results
Here’s my favorite before-after shot it created:
Pretty cool, right? The lighting looks spot-on and realistic. But honestly, that’s mostly luck—the AI didn’t actually adjust the lighting on my face; it just happened to pair well with a background from the catalog.
More Results
For more consistent results, try selecting your background directly from this view:
Noteworthy
This isn’t a traditional headshot generator since it doesn’t create a new face. Instead, it uses AI to remove your photo’s background and swap in a fresh one.
There’s a good selection of pre-made backgrounds, so the process is fast and you can easily try out different looks to see what works best.
One downside: the backgrounds are fixed. The AI doesn’t generate a new background each time you hit “generate.” So really, it’s more of a background remover and changer than a full headshot creator.
But like I showed, if you start with a solid photo, the final results can look surprisingly good!
Pricing
Free!
10. PFPMaker
Best HeadshotPro alternative
PFPMaker is an AI-powered tool designed to help you create professional profile pictures in just a few clicks by swapping out the background of your images.
This tool is also free and much faster since it doesn’t generate new images but simply removes the background and replaces it with a pre-built option. So, technically, it’s not a traditional headshot generator.
With robust AI tools for background removal, image enhancement, and template customization, PFPMaker allows you to bring up your existing photos to create a good-looking profile picture.
My Results
Here’s the before-and-after shot I got from PFPMaker:
My Experience
To use this tool, just upload an image to this view:
Wait for 10 seconds:
Enjoy your images:
Noteworthy
This tool doesn’t generate new faces—it uses AI to remove backgrounds and swap them with pre-made options.
The process is fast, and you can easily try out different backgrounds to find the one that suits your photo best.
Since the backgrounds are fixed, the AI doesn’t create new ones each time you hit “generate.” So, it’s more of a background remover and changer than a full headshot creator.
That said, if you start with a good photo, the results can be surprisingly impressive.
Plus, you can make edits to your images right within the tool:
Pricing
Free!
Before you go…
AI headshot generators are great, but their results aren’t always perfect. They’re fast and efficient, but sometimes features can look a bit off or robotic.
That’s where BetterPic really stands out. Real human editors fine-tune your images to make sure they truly look like you—no glitches or awkward vibes.
It combines the speed of AI with human precision, so if the first result isn’t quite right, BetterPic makes sure the final photo is spot on.
But if you’re still interested in Kiwi Headshots, please continue reading. I will show you results and how it works.
Disclaimer: This post has affiliate links at no cost to you.
My Results & Experience
That’s my short, honest opinion of Headshot Kiwi.
However, there still were some good images in the mix. I liked the results, but it’s just not the best tool out there. Not even close.
In this part, let me dig deeper into the details and results. I’ll also show you how those compare with the best AI headshot generators on the market. After all, I’ve spent over $3,000 on my AI headshots—just to do reviews like this to save your money and time.
How to Use Headshot Kiwi
Using Headshot Kiwi AI is promised to be easy… Just enter their website, sign up, and start the AI photoshoot.
I got myself the $39 package to get 120 AI headshots.
(By the way, if you test multiple AI headshot generators, I always recommend choosing a plan with which you get about 100 AI headshots. This is because even the best tools fail often. If you just get 10-20 images, chances are there are no good results. But if you grab yourself a 100-headshot plan, you’re almost guaranteed to get some results.)
Nonetheless, let’s move on with the process. To create AI headshots, please, read the instructions.
This is where things got a bit frustrating.
When I uploaded my photos, the platform would quietly reject them—no error messages, no feedback, nothing.
I ended up having to come back multiple times just to try uploading more images.
One thing to note: the tool asks for a whopping 13 images. So you’ll need 13 decent-quality photos right off the bat. If you’re like me and don’t take a ton of selfies or photos, that’s a bit of a stretch.
And then, once I finally got all the images uploaded, the entire site suddenly crashed. Thus far, it has been probably the most hard-to-use tool I’ve tested (and I’ve tested over 40 of these).
This happened twice—once right after I logged in, and again when I started uploading images.
When I finally managed to upload everything, I figured I was all set to get my headshots.
But nope.
I hit “Start AI Photoshoot”… and nothing happened.
Even though I had already paid, the button just didn’t respond.
Honestly, I thought I’d just been scammed. I was pretty disappointed—there were no errors, no warnings, nothing to tell me what went wrong.
I ended up having to debug it myself.
I clicked back a few pages and finally noticed that only 11 out of 13 images had uploaded, even though I’d tried uploading at least 20.
Still no warnings anywhere. I had to piece this together on my own.
After uploading the photos for what felt like the tenth time, it finally kicked off the headshot creation process.
I came back about two hours later, and the headshots were ready.
But before I show you the results, here are a few real photos of me so you can see how they compare:
Now, let’s compare those real images above to the AI-generated headshots:
Honestly, at this point, I wasn’t expecting much. But to my surprise, a few of the images actually turned out really well.
Here are some of my favorites:
That said, there was still one big issue: image quality. The photos just aren’t sharp or high-res enough. No matter which one I picked, it always looked a bit blurry or pixelated when zoomed in. On small thumbnails, it wasn’t as noticeable—so maybe they could still work for something like LinkedIn.
I also realized there’s no way to edit your photos. So if you get low-quality or just plain bad images, you’re stuck with them.
Here are a few examples of the lower-quality ones:
Also, don’t expect every image to be a hit. Out of the 120 I received, I’d say only about 8–10 actually looked good. In most of them, the teeth and lips were off, and the eyes had this strange, awkward stare.
Alternatives
Headshot Kiwi isn’t anywhere near the best AI headshot generator out there. It honestly felt like something thrown together over a weekend and then just left to sit.
I’d recommend going with a headshot tool that’s more polished—something that’s actually being maintained and improved.
The best headshot generator I’ve ever tested is BetterPic.io. Use JALLI10 to get 10% off.
A handful of the shots actually look pretty good—even if they’re still not razor-sharp.
Quick turnaround: my headshots showed up in about 1–2 hours, whereas other services can take 5–10.
Cons
Most of the images are just plain bad.
Everything comes in low resolution; nothing is truly crisp.
The site is clunky and glitchy from start to finish.
No way to tweak or customize the results once you get them.
No email alert when your headshots are ready—you have to keep refreshing and hope for the best.
To Take Home
Headshot Kiwi feels unfinished. While a few images turned out decent, the low quality, clunky experience, and lack of customization make it hard to recommend.
If you’re serious about getting good AI headshots, there are better tools out there—this one just isn’t ready yet.
Set the AI headshot preferences, such as your hair color and ethnicity.
Once you’ve set your characteristics, it’s time to choose a bunch of AI headshot styles for your images.
You can choose up to 7 styles. These are essentially 7 different photoshoots all done with AI in seconds. Isn’t that cool?
Then, it’s time to upload your selfies to the tool:
Remember that this is the most important part of the process. This lets the AI know what you look like for the best headshots.
The only thing I didn’t like about this part was that the tool asked for 20 images. Most people (I believe) don’t have 20 recent images of themselves readily available, right? Nonetheless, after a while I found good images of myself and sent them for the AI to process.
Then the tool also asks for your favorite photo. This is the “base image” that the tool will then use to get you the best results.
Secta AI is handy. You don’t need to wait for the results. Just close the window and come back once they send you an email about the completion of the headshots.
Speaking of results, let me next show you the results I got from Secta AI.
Results, Quality & Accuracy of Headshots
Here are my three favorite AI headshots that I got from Secta AI:
Those look super cool to me. In fact, I love the Northern Lights image the most because it looks like it’s taken in Finland—which is the country I come from.
Also, it’s not just one image you get but a whole bunch more.
Here are more results that I got:
To me, most of these images look realistic and exactly like me.
Of course, some of these are total failures. Also, I think that the image quality is not the best. But out of the over 100 images I got, I’d say there are at least 20-30 really good ones I could use.
If you compare this with the other similar tools, you’ll see that most tools just give 3-5 good images and 95 failed ones.
Customization
Secta AI is one of those headshot generators that also lets you edit your images with AI.
This means you can change backgrounds, create variations, expand images, upscale, recolor, and more. You can even tweak your facial expressions.
This is pretty cool. I had to try the clothing feature here.
Here’s an image I like but that I want to make some small edits to:
This image is cool otherwise, but I’d like to change my jacket to be red.
Well, thanks to Secta AI, that’s easy to do.
I chose Red Outdoor Wear from the edits and waited for a couple of minutes.
Here’s the result I got:
That’s pretty cool, isn’t it?
In fact, it created not one but 10 different variations of this image.
However, one problem I noticed is that the headshot now looks a bit unreal since it changed my hairstyle. In most of the images it looks like I’ve been attached to the image unnaturally too.
So this editing feature is cool, but not perfect and I’d say I can’t use these images.
Speed & Processing Time
Secta AI is a bit slower AI headshot generator.
As I mentioned, it took a while to find 20 images of myself that I had to send to the AI.
But then, it also took about 3 hours for the headshot generator to create my headshots. That’s one of the slowest headshot generators I’ve used thus far.
But the edits are faster. If you request an edit (with a monthly paid plan), you get 10 different variations of your images pretty quickly.
Pricing & Value for Money
The pricing is simplest in Secta AI. There’s just one consumer plan for $49.
Considering the number of styles, headshots, and the quality of results, I’d say this is a fair price.
Also, this is a typical price in most AI headshot generators as the middle-tier plan.
The cheapest headshots I’ve seen on the market were around $15 and the most expensive are $100.
However, this is what I don’t like about Secta AI: The editing/customization features cost a monthly recurring fee.
To me, this is stupid. For me, AI headshots are a one-time thing. I’ll create those, edit them for an hour or two, and then never return. Why on earth would I pay a $20/month recurring subscription fee?
That makes no sense.
But without the paid plan, I’d say the results are really good, among the top 5 AI headshot generators that I’ve tested.
The only tool I think that’s better is BetterPic. They offer free edits, human edits, and the best quality outputs.
Pros & Cons
Pros:
Easy to use
High quality results
Lots of editing options
Lots of different styles
Versatile outputs
No AI vibe (mostly)
Cons:
Very slow processing
Requires 20 images of you!
Monthly hidden fees if you want to edit your headshots
I think Secta AI is an awesome AI headshot generator.
It has just a one-time paid plan with which you get over 100 AI headshots.
On top of that, you can subscribe to a paid monthly plan to edit your AI headshots. I don’t like the fact that it’s a recurring payment, but the results are good, so that might be worth the shot.
Rating: 4.3/5
However, I think Secta AI is not the best AI headshot generator on the market.
The best tool for me is BetterPic. It gave the best results, customizations, and price.